Tuesday, October 13, 2009
50, Ground floor stonework completed. (for now!)
For these blocks I used some large stones, ex railway platform coping's, as well as one squared stone weighing in excess of 450kg, (which yielded 2 blocks), from my stockpile of "scavenged and hoarded" bits and pieces. As the maximum cut of the saw is 440mm and I wanted the blocks slightly wider for later trimming the last bit of stone was broken apart and cleaned up later.
Once roughly cut I needed to saw a 45deg bevel to one top edge to match that of the limestone in the string course. Rather that adjust the saw for the angle, I found it easier to set up a simple cradle in which to mount the stone.
With the bevel cut accurately it was a simple matter, albeit time consuming, to hand chisel the exposed surfaces. This completed the next step was to cut a rebate in the lower face to allow the flooring to slip slightly under the nosing, this is to enable it to be better sealed to help prevent water egress. Following this, a drip groove was sawn on the bottom to ensure any moisture which does penetrate can be sheeted to the outside, this is of particular concern over the bay windows.
The weight of these completed blocks averaged about 180kgs which raised the problem of being able to gently place them in their final positions. To overcome this I made a lifting clamp specifically for this purpose, with a bracket hooking into the rebate and a pin which locates in a shallow dimple drilled in the back, it worked like a dream. This clamp can be modified down the track to handle any other shaped stones of similar thickness.
A four foot doorstep was also needed, but my stockpile did not include any blocks clean enough to be used "as is" for this purpose, so one needed to be trimmed down. Rather than spend the time hand chiselling, I opted to try a different method, this entailed making successive light saw cuts across the top and front face of the step, simulating a tooled finish. The process took a little longer than I had envisaged. The top, needing a saw spacing of about 1.5mm for a nice finish, took 4 continuous hours to complete, while the face, at 2mm spacing, took 3 hours. The saw blade, by now has had considerable use and the cutting tips have become very rounded. This necessitated the close spacing required to avoid having the corrugations too deep. The lighter blotches visible on the finished step are areas of quartz which naturally occurs in basalt, this tends to fade and discolour over time, becoming much less obvious. I am very happy with the end result and feel it was well worth the effort.
Lifting the blocks to their rough positions.
The lower front wall finally complete, showing the recesses for the upstairs windows.
The almost complete east wall. The top bevel on the limestone in the string course will be trimmed true once the blocks have dried out.
Thursday, July 30, 2009
49, The threat of bushfires.
The bulk of the wood I cut into short pieces suitable for splitting into firewood as it was unsuitable for milling.
Having a friend who, in the 2 years since he procured his explosives licence, has not had the occasion to put it to use, gave us the opportunity to remove one of the more stubborn stumps the fun way. After the placing of 3 sticks of gelignite under the offender only resulted in blowing the dirt away, we drilled 2 holes into it with another stick placed in each. The end result of which is shown in the above photo. Click on this link for the video of the event.
The removal of the native eucalyptus trees threatening the drive also afforded me the opportunity to complete the planting of elm trees to fill the voids in our avenue.
With enough cleaning being done to satisfy me for the time being I was able to re divert my attention back to the house.
Next on the agenda, while I was still set up for cutting bricks, was to form the upstairs bedroom fireplace and raising the stack as high as possible underneath the temporary roofing. The front of the opening is formed to the same dimensions as on the ground floor but the breast needed extra width to provide ample insulation for the flues. This I achieved by stepping the stack out by a 1/4 of a brick and narrowing the internal width of the opening by the same amount.
The completed lounge chimney with the bedroom fireplace and hearth over.
Sunday, April 19, 2009
48, More floor joists.
The fireplace brickwork erected to the joist level for the first floor, the central bed is formed to accommodate the upstairs hearth.
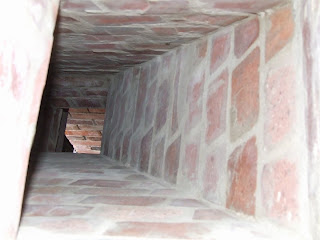
The view down the kitchen flue showing the angles required to bring it over to the upstairs chimney breast.
The need for the remainder of the first floor joists coincided with the arrival of my annual leave from work in late March, it was again time to start making large quantities of sawdust. The kiln and my stockpiles of sawn and previously dried timber needed to be unstacked and sorted, extracting all the lengths of 12 by 2's. These all had to be planed true on one face and edge and then dressed and sized to the finished dimensions of 290 x 45mm.
After machining, to give the wood some short term protection from the elements and longer term protection from the local termites, (which have already made their presence known around the place,) I am now painting all my timber with a concoction consisting of turps, linseed oil, paraffin wax, bee's wax and a product called permethrin, a residual insecticide. Into this mixture I also added some tracer dye to allow easy identification of treated pieces. The only cheap dye that I have so far been able to procure is pink in colour and made for weed killer, this stuff tends to fade out after a couple of days of exposure to the sun.
The Joists, all finally in position after nearly four weeks of toil, I had thought that I was going to have had these completed within the first week, but as usual, my guesstimations were again, way off.
Much of the time was spent having to continually re erect and re position the scaffolding to allow the correct positioning of the members.
The framework in place to allow the pouring of the concrete hearth, a couple of days were occupied cutting the wedged "tusk tenon" joints for the trimmers
On the last Sunday night of my holidays I had the concrete for the hearth mixed and poured, finally completing this stage of the construction
With the four weeks I had up my sleeve being almost entirely consumed with this, it was a bit disappointing for me.
Thursday, February 26, 2009
47, Fire places.
I need to complete this structure to the first floor level to enable me to frame up the remaining ground floor internal walls.
The Lounge room fireplace with the arch completed. The top row of voussoirs are cut to angle inwards to correctly align with the throat. I am still on the lookout for firebricks at the right price with which to line and form the correct internal profiles up to the height of the smokeshelf, this will be installed later.
For the wider opening and narrower breast of the Kitchen stove recess I opted to install a lintel rather than an arch, shown above, freshly sawn from one of my rocks.
Lifting the lintel into position.
All done but it wasn't all smooth sailing, after moving the lintel into place I realised that when cutting it to suit the brick courses I hadn't allowed for the mortar joint. Rather than remove the block and lug the 200kg lump back to the saw, I opted to hand chisel out the beds and roll it 180 degrees. With this hiccup sorted it was now back to the bricks.
The structure is growing, the flue from the loungeroom fireplace, seen sloping to the left, needs to be offset to the side to allow it to pass up through the breast of the upstairs fireplace, while the kitchen flue on the right, is angled at 45degrees in plan, to allow it to pass through the opposite breast. The brickwork for the kitchen stove recess will terminate at the first floor.
Monday, January 5, 2009
46, More scaffold?
The new year has arrived and I have the scaffold ready for the next instalment. It took me close to two weeks to raise it the 1.5 metres needed and used nearly all of my remaining tubes. I am still looking out for more, if anybody is able to assist!
With the scaffold in place I was then able to place the reinforced concrete beam to tie together the completed ground floor walls, shown above, with the steel in place ready for pouring, and below, all done. Another hurdle cleared.