Friday, December 28, 2012

68, Front Door, part 2.


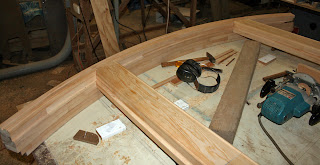
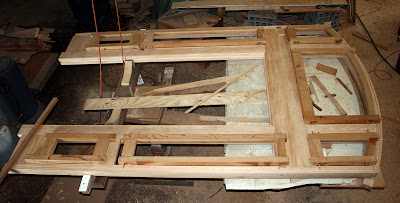
With the main components prepared, assembly of the frame could begin. The curved joints on the Head were first. I figured that these would be the hardest to form and get the shape right. Once I was happy with them, I was able to set out and mark the rest of the pieces.


The Transom was halved over the Mullions and rebated into the Stiles


After two and a half weeks and much routing, chiselling and trimming, all the major components are finally dry fitted together.

The sashes were next on the agenda, then, with these ready, I was able to move on to the machining of the external embellishments. That was when the trouble started, the thicknesser refused to power up, with the main motor only producing a loud humm.....I was about to head off sideways again.....

Monday, August 27, 2012

67, Front Door, part 1.

Now that most of the "holes" in the walls had been plugged, I was now able to divert my attention to the the big opening, in the front, for the main entrance. This, I wanted to be "special" and had, for some time, been scouring my photo collection and the Internet, as well as taking every opportunity to ply the streets in search of inspiration and suitable examples.

The most favoured of all the designs that I came across belonged to "Foynes" and "Eastcourt", A pair of extremely beautiful houses located on the hill, on Powlett Street, East Melbourne. This pair of adjacent dwellings were built during the late 1880's, the construction of both being overseen by the same architects.


This is the impressive entrance to "Eastcourt", (which, at this time is undergoing some restoration work, hence the scaffolding). It has a lovely 'storybook' feel to it and had me captivated with the delicacy of the detailing. With this design though, a major concern for me, at my location, is the space between the twin columns. The local mud wasps would have this void filled within the first couple of weeks of their nesting season, not to mention the continuous "buzzing" as they incessantly achieve this!. The gaps between the Dentils could also present a problem in this regard, but they would be easier to clean out and omitting this feature from the design would seriously detract from the finished product.
Also of concern is the waist height Cornice on the tops of the Pedestals, although aesthetically pleasing, it protrudes into the door opening at least 3inches and, in practice, may lead to unwanted injuries. The one on the right hand, opening side, showed signs of impact.


The entrance on "Foynes" is much more austere, but the single columns tend to give it a more "grander" look.
I felt that I would be able to marry together, my favourite elements from both of these doorways.
With the design for the frame settled on, I was then able to sit down and prepare some working drawings. On my place, the opening dimensions of 1750mm wide by 2935mm in height, which I had allowed for, between the stonework, scaled down to very close to 10% smaller than both of these examples. This worked out quite well, with the original doors, being approximately 2300mm high, it suited a standard door height for me of 2040mm.


The entire frame was to be made using Celery Top Pine, mainly all the 1.5" thick stuff, set aside while preparing the frames for the windows. First up for the physical part was to sort through all the left over shorts and bandsaw enough of them, to a suitable curvature for laminating together to form the segmental arch head. To ensure that I maintained the correct profile, I formed this in stages. I glued and clamped the first four lamination's, as in the above photo, which I allowed to fully harden before building up the remainder.

When complete I cleaned the dust and cobwebs from the compass I had knocked up when making the frames for the back door, seen here; Joinery-part-one.
With the router mounted, I then trued up the piece, rebated it for the sashes and formed a beading on the inside arris.

With the head taken care of, the vertical components were then laminated up. The sticks I had, at close to 2.7m in length, were just barely long enough for the Stiles. The Mullions, though, were longer, so I joined them where they will be rebated at Transom height on the inside face and near the base on the outside, where most of it will be hidden behind the Pedestal.

The next major component for the frame to be done was the Transom rail. With overall finished dimensions of 286mm high x 68mm thick, (excluding all the cornices etc.), this chewed up a fair bit of wood and was laminated in 2 stages. Firstly, the wide sections were joined, before being planed flat and then the two halves were sandwiched together.
Once complete, the rebates were formed, arris beading's routed and the lower outside face was moulded.

The inside face of the Transom is quite broad, much wider than that which is usually found on Victorian entrances. The central glueline also detracted from the overall appearance and it was quite obvious that some form of embellishment would be needed.
Unfortunately, following many repeated and futile attempts to gain access to either Eastcourt or Foynes, I have not been able to view or photograph the interior joinery. The former almost appears to be uninhabited, with no responses to repeated door knockings or letters, (although a dog was heard barking inside on one occasion!), and with the latter, ingress has been denied by a very uncooperative resident!.
On the up side, I have been able to locate and view a few other examples of deep Transom rails around Melbourne.

This entry, in North Brighton, had decorative rebates carved into the sold panel. I very much liked the idea, which gave it very nice, individual "hand made" look. This would not be ideal for mine though, as the glue line would still be very obvious.


Doors on the Presbytery at St.Monica's in Footscray, (above), and at Flinders St. station, (below), had recessed panels, fitted with insert mouldings. At this stage this is probably the style which I will adopt. I will leave the machining of this until as late as possible, should an alternative become apparent.


Some other examples, I have gleaned from the internet include;

Labassa, at Caulfield, which appears to have applied mouldings,
Rupertswood, at Sunbury, with a lot of lovely intricate carving,
The Woodruff-Fontaine Mansion, from over in the States,
and this example, which was being sold on Ebay, which has a simple 'Cricket bat' shaped piece applied.

Sunday, July 8, 2012

66, ...and in they go.

Before the windows could be installed, the vertical stone rebates needed to be trued and trimmed out with a jamb. The three earliest window openings, which I had constructed prior to the building of my stone saw, were made just wide enough to fit a window in snugly. Subsequently, I realised that a timber jamb would need to be fitted, in order to provide some method of securing the frame. In the photo above, the rebate on the right has now been shaved out to the required 100mm to accomodate a 21mm thick hardwood jamb, with the left hand side waiting to recieve the same treatment. The mortar joints needed to be chipped out before I could rough out the rebate using a chainsaw, with chisels and sanding blocks used for the final shaping. This wasn't one of the most fun, (or cleanest), jobs I have had to endure!

The 90 x 21mm hardwood jambs were glued and screwed to the limestone using 100mm galvanised, countersunk "batten screws". These were driven into pre positioned, Ultra Long RamPlug's, which were glued into cleaned, pre drilled holes using "liquid nails", before allowing a couple of days for it to set.
For subsequent windows I have found that a product called; KF2,  a Polyester Injection System, (picked up from eBay, of course!), offers superior holding power for the screws and I now set the RamPlugs in with this. It is, although, more labour intensive, with a pilot hole needing to be bored, using a masonary drill, into the cured plug.

Working on my own, I was easily able to manouvre the windows around on their sides using pipe rollers, however, getting them up the steps and into the front of the house was going to be somewhat more difficult. To achieve this, I jury rigged an pole, with a swivel coupling, to the scaffold frame. This was supported, using a chain, from a higher level. I positioned it so that an attatched electric winch would pivot between a point above the landing, which was about the same height as my van floor, and the centre of the verandah. This system worked flawlessly and once at floor level, it was a simple matter to roll them where required.

With the bottom of the window frame shaped to fit into the rebate in the stone sill, the plan for the installation was to form a table at sill height, lift the unit on to it, apply the flashings and mounting brackets, locate the timber sill into the opening, then lift the window up into position. What I didn't allow for was the internal stone arch, which prevented the side/angled bay windows from being tilted up in this manner. To compound the problem, after wiggling the window almost into position, I was reminded of another issue.
Some years back, when laying the stone sills for this bay, a stuff up, on my part, had me place them about 10mm too high. This error wasn't picked up until setting out the limestone quoins, which were adjusted to suit, to ensure that the lintels were all level. I had completely forgotten about this by now and, of course, these were the only openings not checked when calculating the window dimensions. So then, of course, the odscenities started!.

Following my 5th attempt, after much planing, trimming, adjusting and swearing, the first window was finally in, but I am more than happy with the result.


To secure the windows to the jambs, I made a number of brackets from 3mm stainless steel angle. These measured about 30 x 22mm and were about 20mm wide. The long leg was screwed through the ply backing into the inner lining and roofing screws, fitted through the other leg and drilled into the jambs, pull the frame firmly into the rebate.
I didn't notice until uploading this image that this particular mount was the one that needed to be rotated slightly, this was to enable a new hole and screw to be drilled into the jamb. With all the refitting of this window, at least one screw had to snap!.

Thursday, July 5, 2012

65, Windows, finally getting somewhere!

With a decision made on the glass, I could now make the glazing beads to suit. In the past, for this type of moulding I would make up a cradle to fit inside the thicknesser and run them through one at a time. There was usually a high mortality rate with this process, the rollers,when set firm enough to overcome the friction in the cradle, tended to crush the wood, causing it to curl. A lot of wastage was also normal, with about 200mm of the ends needing to be docked, this being due to excessive chatter occurring until the leading edge of the mould was steadied by the outfeed roller and after the trailing edge cleared the infeed roller.
My newest toy, the sander was pressed into action. I cut a tray, slightly longer than the longest bead, onto which I tacked and glued some sawn wood, of the same profile. The beads, sawn slightly oversize, were then placed in the corrugations and passed through the machine. I could sand six at a time and found the method worked perfectly, with no pieces being rejected or needing trimming as a result.

I produced enough beading's for all the windows, with about an extra 50 for spares, should any be needed down the track. With these ready, more monotonous labour then ensued, with the bulk of them being primed and receiving one top coat, all around.

Next on the agenda was the glazing. For the cutting of this, I stretched a blanket across my work table and clamped on a few wooden blocks, to cradle a large square.
The upper and lower sashes were made to have identically sized panes and I had taken great care to ensure that they were all true and of the correct dimensions. This enabled me to pre cut all the pieces of glass to set sizes.
From the same supplier as the double glazing materials; C.R.Laurence, I also purchased a number of silicon carbide sanding belts to suit my 4" sander. I was rather hesitant to go anywhere near the glass with this machine, as had been recommended to me, but it proved very successful in removing the sharp arris as well as sanding true any mis cut or oversized pieces.
I fitted the glass using a bead of "glazing sealant", a product by ROCOR. This stuff is water based and comes in cartridges, for use in standard caulking guns. It is designed for use with timber frames only. It forms a skin on it's surface but remains permanently soft and flexible. Any clean up of misplaced or squeezed out material is easily carried out by waiting for it to skin and simply rubbing it off. It is also just as easy to clean out, down the track, when replacing glass. It can be a bit hard to source but is available in Australia from Lincoln Sentry. I find it far superior to silicone, which can be a nightmare to clean off.
Once I had the sashes glazed, the outside faces were given another coating of gloss enamel before the final assembly. With that out of the way, the scales were then given a workout. The sashes were weighed and the cast iron weights were cut to suit. They were imbalanced by about 1/2 a pound, to give a slight bias to keeping the sashes closed.
More consideration was given to the provision of parting slips and I opted to fit them. If the idea of double glazing rears it's head again, sometime in the future, they would be necessary to prevent square cast lead weights from interfering with each other. Made from two laminated strips of 3mm ply, I screwed them to wooden blocks fixed at the top of the box's. They are normally poked through a slot in the head and secured by a dowel, but limited space over the windows precluded this method. If not fitted now and installation of them was required at a later date, it would necessitate the complete removal of the windows. After the weights were fitted, the box's were sealed with 10mm ply, screwed to the linings.

Finally, I could start to see some of fruits of my labour, the first completed window awaits loading into my van to be taken down the hill.
The brass latches were purchased via eBay from the UK. This was another typical example of how we are "ripped off" in this country. The total price, (buy it now), including the relatively expensive shipping cost of these items, manufactured by our Asian neighbours, was less than 50% of the cheapest Australian retail price I could source.

Sunday, June 24, 2012

64, Double Glazing,......or not?

By May the sashes had been trimmed to fit, sanded and grooved down about 2/3rd's of their sides for the ropes. They were now ready to be painted, just in time for an early onset of a cold and wet Winter!.

For the remainder of this stage, the downstairs windows were to be completed and installed first before I would tackle the rest.
Prior to final assembly, I coated the internal faces of the sashes with a light stain, to darken the timber slightly and reduce the contrast with the Blackwood linings. This was followed by 2 coats of polyurethane. The outsides were primed and then given one coat of gloss enamel, also sealing the glazing rebate. To save my limited space, I knocked up a drying rack, in which I could place 12 sashes at a time. The cold and damp delayed the process and each coat was taking up to a frustrating 3 days to dry.

The Frames were also given a similar treatment and spread around all the available floor space. During my working stints in the workshop, I used a gas patio heater to warm the air to help the drying but, due to the fire hazard, I wasn't game to leave it on when not present. With an 8.5kg gas bottle only lasting up to 3 days anyway, it wasn't proving to be too economical!.
During this time, my research into the different methods of double glazing never waned. After much deliberation I settled on a product called SuperSpacer. The main advantage with this, in my situation, was that was available in a narrow 4.8mm, this would enable the panels to be kept to a minimal thickness of about 13mm. If the air space was made any wider, even though efficiency would dramatically increase, the units would not fit in the frames.
The spacers, reasonably priced at around $2 per metre, are a flexible, desiccant impregnated, pre glued strip. They require some sort of application jig to maintain a uniform margin and straight lines. I travelled across Melbourne to the helpful suppliers, C.R.Laurence, and purchased 4, twenty metre rolls as well as a sufficient quantity of the secondary sealant. A small plastic "Hand notcher", used for the spacers placement was priced at about $230, but was not suitable for the narrow 4.8mm strip. A close inspection of one showed that it would be possible to be modified, but I figured, for the price, I could make my own. The "Hand notcher" was also designed to provide a 4.8mm set back from the edge of the glass, required by the manufactures specs., for the secondary sealant. To reduce the sight line in my sashes, which have a 1/4", (6.35mm), wide rebate I would also need to reduce the setback.

I fashioned my home made applicator from a scrap block of Celery Top Pine. It included a sprung plastic roller, to firmly press the spacer to the glass. I initially made it to provide a 1mm setback, as it could later be shaved to increase this. It worked extremely well and I had intentions of adding a plunge action punch for notching the corners. This would be added after any other fine tuning that was required.
I made a couple of trial units to get a feel of the process and assess the results. It was surprisingly easy to do, but with only one pair of hands it was quite difficult to hold the glass steady, work the applicator and feed in the spacer, which needed the plastic tape removed in advance to expose the adhesive. This led to the spacer drifting at one point when it stuck to the glass ahead of me. 1st negative!. Being a trial, I opted to leave it as is, to see how unsightly it would look.

Once I had fitted a trial unit, my fears were confirmed. Even with the minimal setback, the grey spacer was quite pronounced and detracted from the overall look. 2nd negative!.

On the upper left stile on this sash can be seen where the spacer drifted, not looking too good!. It also demonstrated how much grey would be seen with a more suitable setback, way too much.
I assembled the second trial unit to temporarily replace a broken pane in a bay window in our existing Lounge, the result seems to be somewhat disappointing. On the coldest nights, with the wood stove raging to warm the room as much as possible, there was no discernible differences to the glass temperatures, between this unit and the single panes, inside or out. No doubt, with sophisticated measuring instruments, there would be variances, but would it be worth the effort?, 3rd negative!
Using the 4mm glass that I already had, I found that, although the panels fitted neatly into the sashes, the remaining rebate of 3 to 4mm was too small to be able to accommodate a nailed beading, the rebates on all the sashes would need to be deepened by an additional 3mm for a neat external finish, 4th negative!.


For many years I had been accumulating cast iron window weights from many sources, so long as they were cheap, or free!. My collection received a huge boost, about 10 years back, when I was able to intercept about 84 of them, destined for scrap. I have no idea as to their origin, they were all between 12 and 14 lbs each, (roughly 5.5 to 6.3kg), and I hadn't seen any of this size before. The largest, from the rest of my collection, was 10 lbs, with the average being about 7 to 8. The owner estimated their scrap value to be about $40 and had me part with that for their exchange, not bad for half a ton of iron. I had the notion that these would be more than ample for the increased weight due to double glazing, wrong!.
With the trials made, I was able to start measuring the weights of the glass and sash's to get an idea of the counterbalance requirements. I nearly fell over when the scales told me that I was looking at an average weight of about 40 lb's per sash!, that would require a 20 lb weight each side.
I had designed the hidden pockets, in the pulley stiles, to be larger than normal to allow the insertion of my largest available weight, being 14 lb's and about 650mm in length. With cast iron, there would be no way of fitting 20 lb slugs, even if I could find any. Calculations were made and I concluded that the only way that it would be possible, would be to cast them, in a square profile, out of Lead. This was a path I wasn't too keen in taking, as if I didn't have enough on my plate already!, 5th negative.

The negatives were adding up and at this point, I had yet to find a positive!. I felt that I had given it every opportunity to prove it worthwhile and figured that enough time had already been wasted, so, Double Glazing was out!

The 4mm thick glass also made a large difference to the weight, most early windows that I have seen used only 3mm thick stuff. Even with single glazing, the 14 lb weights were only just going to be suitable for my largest sash's, the average would be about 11 lbs.

Monday, April 30, 2012

63, Back pedal! Enough stone.

A couple of years back, I noticed, during my travels, a large collection of basalt rocks being uprooted from the ground and formed into piles on a property south east of Winchelsea. A closer inspection revealed that a large proportion of the stone was very clean with a fine grain. It appeared that it would be satisfactory for my steps, paving, verandah edging and anything else for which the honeycomb stuff wasn't suitable. The best part was that was only 20 minutes from home, at one of the nearest volcanic eruption points.
Following brief negotiations with the owner, I was given permission to remove as much as I liked, (with his preference being the largest ones!), in exchange for my cutting him "a couple of steps".
The collection of this stone was put on the backburner until recently, with many issues delaying the
procurement. If the truck was not out of action, the ground was too boggy or I was busy on something else etc. The latest hiccup in the saga was the death of the motor in the front end loader. It died about a year ago and the machine still rests, to this day, where it stopped, next door, waiting for a promised diagnosis from a diesel mechanic.
I had intentions of amassing enough of this stone, along with some more honeycomb stuff, to ensure that there would be plenty to finish my house with. We would then be able to dispose of the truck, it was costing nearly $1,500 a year for it to stay registered while spending most of it's time sitting in the yard. I had also booked some long service leave from work, to be taken in early December, 2011, with the aim of achieving this, hopefully in dry weather, before the truck rego was due in February.

With the loader out of action and not wanting to delay the collecting any longer, should the owners situation or mood change, I opted to take my generator and tools on site. There, I would split the rocks into manageable, usable sizes that could be transported home in the trailer.
The longest stone steps needed were to be about 1800mm long, (6ft), so that was my initial aim and started work on the largest of the rocks. I found that the stone was quite hard, more difficult than what I had previously encountered and my first attempts at drilling these proved futile. I then moved to the smaller one above, which was about 8ft long by about 4ft.

The drilling was a little easier on this stone and it furnished me with pieces long enough for 2 steps. The lump that fell off the near end was  due to an inherent crack. This sort of thing, as frustrating as it is, is a good side effect of splitting the stone rather than sawing it. Defects, such as this, are identified before too much work is done.

After the first day, I'm loaded and stuffed!. The near piece on the trailer was the smaller one, to the left in the upper photo's and weighed over a tonne, more than the limit for my block and tackle. The other two were were split from other rocks. The day was a long one and got off to a bad start when the generator refused to fire, despite having been tested the night before. A visit to a mechanic in Winchelsea had a faulty spark plug diagnosed and replaced. My hands became very blistered from the endless chain, when winching the pieces out of the pile to clear ground, (about 6 meters), and then into the trailer.
I managed to split a number of stones ready for loading, however some, such as the remaining piece from the previously mentioned one and another, of which the edge could just be seen to the left in the above photo, were going to be far too heavy for my equipment. If I attempted to split them further, I risked the possibility of them breaking across the shorter axis and rendering them useless. Loading by hand clearly wasn't going to be feasible.


Inquiries were made and the original contractor who had removed the rocks was contacted. He offered, for $100 a load, to send one of his blokes over with an excavator to lift them into the truck. With the offer accepted, I was back two days later with the truck. The first load included the bits that I had already split. One of these, the lump being loaded in the above pic, weighing about 3 tonnes, tested the machines capability and it struggled to lift it to this height without overbalancing. A couple of slightly larger ones were also tackled, but, for those we fashioned a ramp over a pile of rubble and drove them in.
The loading cost was well justified, with the more than helpful operator extracting the better rocks, previously marked by me, from the amidst the piles, while I was unloading the truck.
Four or Five loads were obtained, (my memory is failing me now), and I called it quits when we had taken the most promising looking stuff and I reckoned that I had sufficient for my purposes.. There was more stone accessible, but, the sizes were reducing. Unfortunately, when they were originally being dug out, many were split into smaller chunks for possible future processing. Larger rocks were still available, but they were becoming harder to extract, being buried far too deeply in the heap.


The stockpile at home, with the larger stuff over to the left and the first obtained lumps behind the trailer, on the right.

Also on the agenda for my leave was the collection of two loads of large flat slabs from a quarry at Ondit, near the northern shore of Lake Colac.When originally searching for a source of building stone, I had visited this quarry and although they had some suitable material, I dismissed it as being way too expensive. I figure that I now have close to enough good face stone to complete my house, however, my supply of material suitable for the cutting of "tie" stones was waning. These blocks needed a front to back dimension of at least 415mm, being the thickness of the wall masonry.
A year or so back I re approached the quarry operator and requested that any suitable slabs be kept aside. As the pit is expanded the upper crustal layer of vesicular basalt, (honeycomb), is removed to extract the finer grained material below. This surface layer often produces large, flat, parallelled surfaced evenly textured rock. Being from the same lava flows and located only a short distance from Warrion, where I had sourced my original stone, the color and appearance matched.
When I arrived there, during the week following the stone collection from Winchelsea, I found that the quarry operators had collected more than enough for me and stored them in a disused part of the workings. This was great, it allowed me to select the best of the best!. The hiccup was that the quarry were not happy to load the stone, having only front end loaders they would only load from the rear through the open tailgate, limiting the amount they could put in to 1 or 2 slabs. They did, however, put me in contact with a local contractor who operated a large forklift. Large?, it was massive with a 26 tonne capacity, capable of lifting the fully laden truck!. As can be seen in the above photo, a 2 tonne slab looked pretty insignificant, sitting on the forks.
The exercise didn't come cheap with the stone, at nearly $30 a tonne, costing over $600 for the 2 loads. The loading proved quite fiddly and time consuming with the limited maneuverability of the forks and set me back a further $150, at least I didn't have to also find cash to pay for transport costs.

The largest slab, taken in the first load and seen on the bottom, to the right of the truck in the above photo, was estimated at about 4 tonnes. The one on top is about 3 tonnes and the other 3 from that load were about 1 tonne each, the total load being just over 10 tonnes.
I should now have more than enough raw material for the house and can now channel more energy into actually putting it together!. For the remaining two weeks of my leave, my attention was diverted back to the rebuilding of my sanding machine.

Saturday, April 28, 2012

62, Sash assembly.

One detail, previously not mentioned, is the beading I had run on inside faces of the sash pieces. When I built my initial cottage, seen here in the beginning, It was designed and built around the 2 front windows. These I had rescued from one of the last remaining, original cottages in Torquay. Sited on the main Geelong road, it was being demolished to make way for the exploding surf industry. You can't stop progress, but it was all I could do at the time to preserve the past. The wood stove from the kitchen was claimed as well, but unfortunately, the chimney came down, rather quicker than was expected, and reduced it to scrap.
The beading's on these windows are the standard Victorian profile with the size matching the glazing rebate of 1/2" x 1/4", (12.7mm x 6.4mm). The curve segment is less than 1/4, giving it a flattened appearance. The balance of the windows in my cottage were a combination of some crappy recycled hardwood frames and 3 other sets I made myself, my first foray into this area. For these I purchased "off the shelf" moulded cedar, (western red), stiles and rails, although the beading moulding was different. I was happy with the results and the kitchen window is still working beautifully, the other two were removed to make way for the "extension". The construction of these gave me the confidence to completely make, from scratch, a new Bay window, shortly before I commenced the extension. This was to replace the large, rotting hardwood frame that I had installed in the west wall. This time I made some effort to replicate the original beading's using a small, 1/4 segment, concave router bit. I tweaked the stepped shoulders to get the nearest visual likeness that I could. This worked reasonably well, but, when it came to the windows for the main house, my standards were improving and near enough wouldn't be good enough!. For these I bit the bullet and ordered a new router bit, custom profiled. During my travels I had managed to procure an old wooden hand moulding plane with the correct blade for doing these, however, my enthusiasm for the construction did not quite stretch far enough to go down that path!.

Having all the main pieces machined, things became more hands on and fiddlier. The faces of all the stiles, at the base of the horns, adjacent to where the meeting rails join, had to made flush with the rebate and sanded smooth. The beading on the lower stiles was shaved back and scribed, however, on the upper stiles it was cut flush as, on these, there is no bead on the meeting rail.

The opposite ends of the stiles required rebates to be formed to accommodate the haunched tenons, this prevents the top and bottom rails from twisting. Then the beading's were also cut back and scribed.

A test fit of a meeting rail and a stile for a bottom sash. On the lower sashes, the glass fits up into a groove in the meeting rail .

No shed is ever big enough!. I could only scrounge enough room to set up two gluing tables and with the exception of the narrow sidelights, shown in the upper photo, I was only able to set up enough clamping for four sashes at a time. This worked out to be sufficient anyhow, as it was taking anything up to an hour to prepare each sash, this included the previously mentioned trimming and the fine tuning of the shoulders and scribes to true up the joints. I struggled to keep up, having enough sashes prepared for when the glue on the previous lot had set.
For 6 days straight, I had 2 clamping sessions per day, one about midday and the other about midnight. These sessions took about 2 hours each, by the time I coated the glued surfaces, assembled the sashes, lightly clamped and squared them, tapped the wedges firm, hammered in the joint wedges and then wiped all the excess glue from the faces.
I do possess an odd collection of sash clamps, but, when set up for this sort of work they tend to be unwieldy and hard to control. With their average lengths being about 1800mm, (6 ft), they would also require a lot more space. For this project I opted to assemble simple clamping jigs using wedges. The back blocks, being screwed down, could be easily relocated to suit the differing widths. I hadn't tried clamping this way before but was very happy with the method, it was very simple and effective.
By the last night, I was buggered, but was certainly glad to have had this bit over with.

At last, the sashes are together, all ready for trimming and sanding. They all look good, bar one. In my haste, (or stupor), to clamp up the final batch, I was careless with one joint, then over clamped it to close the gap, which led to it twisting. Fortunately though, it was for one of 2 sidelight windows which are fixed in place.

This simple jig, set up on my bandsaw, allowed me to quickly and neatly trim the waste from the wedges and tenons.

The joints are trimmed and the sashes are ready for sanding, before the trimming of the stiles, bevelling of the bottom of the lower sash's, grooving the sides for the ropes and fitting into the frames. There's still a long way to go....